Wednesday, March 30, 2011

FHE in a Jar!


A little over a year ago we had a Family Home Evening where we made these Jars! I'm pretty sure Melissa found this idea! Thanks Melissa! 

We just used Mason jars and fancied them up! A hot glue gun, some scrap fabric, and ribbon is all I used. I made a rosette, and yo-yo (Make it and Love it tutorials) and hot glued them on top of the ribbon I previously glued on! For the lid I just simply hot glued some fabric onto it. So simple....so cute!!
If you go HERE to Jennysmith.net it has the idea papers you would put in the jar. It's great because it gives you the Topic, Song, and Scripture. Just something simple you can pull out if you don't have time/or forgot/etc. I love this! Enjoy!

Friday, March 25, 2011

Fun Crayons and Coloring Book

 I have seen these fun crayons in a lot of different places and have really been wanting to do them myself! I found this silicone baking pan at JoAnn's. I used a 40% off coupon so it was a little less expensive.

I bought 2 boxes of crayons and tore off all the paper and then broke them up and put them in the pan.

I used a cookie sheet and covered it with wax paper in case anything fell off. 

Preheat your oven to 250 degrees (I swear this took forever, but it could have just been my oven). Then once your pan is full of crayons put it in the oven for 5-10 minutes. I peaked in every 5 minutes to make sure things were going well. I didn't realize that when I did it the crayons would be very liquidy. So I'm glad that I put the cookie sheet under since the silicone pan is very flexible.

 After the crayons were done melting I put them in the freezer for 15 minutes and they hardened up super fast. The pan is perfect because getting the crayons out was super easy!
 I also made a little coloring book.

I simply took white computer paper and cut it into 4ths. Then I took a piece of cardstock and cut it to the same size. I used my Cricut to cut the letter of the child's name I was giving this to and glued it on!

To put it all together I used my sewing machine and sewed the top! It was awesome! This way I figured they could be as Creative as they wanted to be!!
 I'm so excited about how easy, cheap, and fun these turned out!

Tuesday, March 22, 2011

Doggy Party!!

So our cute little puppy Link is having his 1st birthday today! Last Saturday we decided that we would invite our friends over for dinner and cake and ice cream!

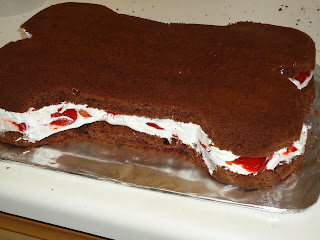
I love making cakes! So I decided to make a bone cake.

I made a chocolate cake the night before and then put it in the freezer for the night. I was a little worried about this, but it actually ended up working perfectly for what I needed.

The next morning I used my spiffy cake tool that cuts the top off and that cuts the cake in half (sorry I don't know what it's called).

I used a mug that was a good size and shaped the rounded part of the bone! Then just eyed down the side to make the bone shape.
 I then filled the middle of the cake with Cool Whip and strawberries. The strawberries were yummy, but they oozed juice out which didn't make it look as nice as I would've liked, but it still worked great!
 After I put the top back on I used chocolate frosting to frost the whole cake. The sides were a little hard to do because of the cool whip, but I was able to do it pretty good! Then I used Lemon frosting to write on the top and pipe stars on the bottom edge!
 I love how it turned out! And it was very tasty too! We even made homemade Peanut Butter Oreo ice cream! Can I just say....Fabulous!

Here is the invitation I made using Creative Memories. It was super cheap as well because I simply emailed it to all our friends! Perfect!!
Don't worry the puppy didn't get any of the cake...but he did get his very own doggy treats!! He loved having all our friends there and he definitely got spoiled with love!!

Thursday, March 17, 2011

Pom Pom Necklace

I have loved finding new jewelry ideas and trying to make them. This is one that Melissa, Kimberly, and I made over Christmas (and yes...I'm just getting around to posting it). Melissa found the idea HERE at Little Miss Momma.

I think they turned out pretty good!
 
Yay!!

Monday, March 14, 2011

Earring Holder

 I made an earring holder quite a while ago. Well...I liked it...but it didn't work as well as I would've liked. So I've been trying to figure out something that would work the way that I wanted. Well last June I was up in Logan for Summer Days and at one of the booths they had this idea. I really liked it and almost bought it....but for a teeny tiny little one it was....well....let's just say a little out of my price range. So I've been thinking for 9 months how I could make this work. 

And I finally did!! My dad has the tools needed to do woodworking...so I waited till I was up for a visit and asked my dad for some help. 

We used pine detail molding for the middle and 2" oak for the sides. We used a table drill to drill holes into the oak just barely big enough for the molding to slide into. Then we used a scroll saw to cut into the molding....then....we used the table drill (with a smaller drill bit) and cut along the same line (just to make it a little bigger). We glued the molding into the oak....let it dry....sanded it down.....spray painted it brown...then covered the back with fabric. Then just to make it more finished I added ribbon to the outside edges.

To hang it I simply used 5 tacks (like you'd use on a cork board) at the top and 2 on the bottom by the edges. It's pretty light so it held up perfectly!!

If I were to do this again, I would do less space in between. But I'll be using this one for a while since it holds 55 pairs of earrings! And it also holds both kinds of backed earrings....even better!

I'm so incredibly excited about this!! I love how it turned out and was definitely worth the effort....and wait!!

Wednesday, March 2, 2011

Easy Chic Bracelet

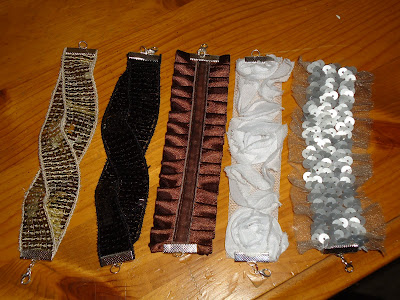
Melissa found this great tutorial over at Blue Cricket Design HERE. It was super simple, only cost us about $20 to make 12. It would've been cheaper....but we had issues at the store...oh well.

We got these ribbon bracelet clips (which are the most brilliant things ever made....in my humble opinion!). Picked out cute ribbon (all at JoAnns) and got it cut.This is really a simple project.

1. Cut the ribbon to the size of your wrist. If you like them tighter cut it about 1/2 inch under the measurement of your wrist, if you like them loose do it the exact size.

2. Make sure you burn the edges.

3. Put the clips teeth open, then use needle nose pliers (or jewelry pliers) to clamp down the teeth on the edges of the ribbon.

The final product!!


Yay!!!
Related Posts Plugin for WordPress, Blogger...