Wednesday, December 30, 2009

Personalized Memory Game

I have 2 nephews and 1 niece that are between 2-3 years old. I thought a cute memory game would be the best idea as a gift for them. I bought 2"X 2" wood squares off Etsy, I can't remember exactly who from, but they were perfect for this project. Then I made pages with each kids name on it. I printed those on card stock, cut them out then mod podged them on the front.On the back I got pictures of 10 different animals doubled and did the same as the front. The only thing to remember is if you do something that has to be a certain direction make sure you double check which direction you're putting them on. I screwed up on that one. But caught myself after doing a few. Sorry Abby.
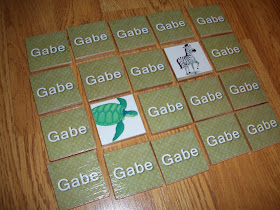
This was a fun thing to do for my family! I hope they enjoy it even if they can't quite use it just yet, they soon will! I got this idea from here at Jamie's Digital Designs. She did this with photos, but I wanted to do animals. Both ways are great!

Saturday, December 26, 2009

Tile Picture

My Mother-in-law told all us kids that she wanted homemade gifts this year. When I heard that I actually got excited, but my SILs weren't too happy about that. I love to find new crafts to make and especially crafts that I can give away! Anyways, I found my inspiration for this idea HERE. I went through my in-laws wedding album and found a few pictures that I liked and scanned them into my computer. I have a program that I used to fix the image and make them sepia. I was just going to use the big picture, but because it was a scanned image the picture turned out fuzzy. So I decided to add the other two pictures and a saying. I really like how it turned out. I purchased a 12X12 tile from Home Depot, or Lowe's (I really can't remember which one) and printed off the picture. Then I cut the picture down so that it would fit the tile, then I put a layer of Mod Podge on the tile, put the tile on, then put another layer of Mod Podge on. I think I even added one more layer just to be safe. I let it dray, and voila, you have a beautiful picture that you can put anywhere in your house!

Tuesday, December 15, 2009

Christmas Coasters

Shanna and I decided to join forces this year and make our neighbor gifts together. We had an idea in mind and spent an entire night going from store to store trying to find the necessary supplies. We could not find what we needed for the price we needed. So we had to come up with plan B. We decided to make Christmas coasters. Here is what we did:
-Bought tiles from Home Depot
-Bought cute Christmas paper from Michaels
-We used my Cricut to cut out the images and sayings we wanted
-We Mod Podged the images and sayings on the tiles
-We Mod Podged over the tiles, twice
-We spray painted an acrylic water-proof sealer over the tiles, THREE times
-We regretfully did this in my storage room and stunk up the ENTIRE house
-We tied the tiles together with pretty ribbon from Michael's and added a tag and candycanes
We hope our neighbors enjoy!

Here's the final product. We gave 4 coasters to each family.

Here's the 4 different coasters individually:


Sunday, December 13, 2009

Framed Santa


We also made this cute Santa frame at the Super Saturday. The lady in charge painted it, and the Santa came put together, so all we had to do was hook it on with wire, curl it, and add ribbon! So easy, but so cute!

Christmas Countdown


I made this cute countdown at a Super Saturday in my mom's ward. The tree is wood, and I used scrapbook paper to cover it, inked the sides, added some hooks, ribbon, and vinyl, and ta-da! A Christmas countdown!

Friday, December 4, 2009

IPod Cover

Once again I wanted to make my hubby something for him to remember me by while he was traveling! He has an ipod classic and I saw THIS tutorial to make a cover for it. It was a pretty easy thing to make

Thursday, December 3, 2009

Luggage ID Tag

Here's another present for the traveling hubby! It's an ID tag that I found HERE on Make it and Love it. I would've taken more pictures but my machine was being really dumb so the seams aren't very good. I need to get it serviced or something. Oh well, it's probably about time.

Wednesday, December 2, 2009

Neck Pillow

The hubby has been and will be flying to a lot of interviews. I saw a Neck pillow tutorial HERE on Make it and Love it and figured I could do that. Well the one she made was for a child so I looked at the shape of the one she made and made a pattern with construction paper. I then cut it out of micro fleece and filled it will fiber fill. It looked great, but it was too small. So I remade it and cut it a ton bigger. I think it turned out great and the hubby said he loved having it during his flight today!!

Friday, November 20, 2009

Homemade Golf Club Covers

My husband loves golf, and he is a big University of Utah fan. So for our anniversary I thought what better gift to give him that something that has to do with two things he loves! So I took one of the covers that came with his clubs and I got some Utah fleece from Hobby Lobby. I took my blue fabric marking pencil and made a mark from the top of the back seam to the bottom, then I rolled in to the front and marked the top and bottom and then continued to roll it to the back again. To tell you the truth I really don't know how I got this to work, but it turned out pretty good! Then I cut out the fabric. I made four covers so I had a front and back for each to make it a little thicker. I also had to make the top, so I took a wider mouth cup from my kitchen and traced a circle and then cut out 8 of those. I used a really thick double iron on interfacing and fused the two circles together, but I made the interfacing circle smaller than the fleece so I didn't have to sew through 4 layers of fleece and thick interfacing. When all of those were done I bought a 1, 3, 5, and H to put on top of the covers. I bought the iron on numbers that were a little thicker so they would last longer. But not only did I iron it on, but I sewed around it as well.
Then I bought black socks (cause they never get dirty!) for the neck of the covers. I just cut them where I thought they would look the best. I didn't worry about cutting them too straight cause I knew the edges would be covered by the fabric.
Then I sewed the two pieces together along the top edge, and then I sewed the back edges together.
Once that was done I sewed the top circle to the rest of the fleece. When you do this make sure that the number is facing the front of the sock. You don't want the number facing the back seam.
Once the top was sewn on I took the black sock and turned it inside out with the rest of the cover the right side out. I did it the first time with them both inside out and I ended up with the top inside out and the neck the right way. So I had to unpick, not fun! Pin all of it together and sew around the top. I did about a half inch seam just to make sure I got all the different layers.
Once you've sewn that it's finished, and you have custom golf club covers that don't take too long and don't cost and arm and a leg!!
The only sad part is he can't use them for another 5 months. Oh well, it'll be like getting a present twice!

Saturday, October 31, 2009

Halloween Apothecary!!!

I saw this idea on the Idea Room and loved it, so I started my own. The labels came from The Love Manor. I have one more bottle I need to add and some spider webs, but I thought it was a good start! Fun addition to my other Halloween decor!


EEEEEKKKKKK!!!!!

I made this cute Eek at a Super Saturday activity. Happy Halloween!


Friday, October 16, 2009

Board

I have been wanting to make one of these for quite some time. I went with Shanna to buy the supplies for hers, so it got me even more excited! I finally got the supplies and put it together. I made mine a little different. I put a corkboard on the left, the glass in the middle, and metal on the right. I have Halloween pins on the corkboard, and I made some Halloween magnets for the metal. In the middle I drew a calendar on the back of the glass so it will not erase (eventually I will get vinyl instead). I put Halloween paper behind the glass, that way I can switch it out each month to go with the month! Now I just need to hang it up and put it to use!


Posted by Picasa

Monday, October 12, 2009

Cute Magnets!

A lot of people have made these cute magnets, and I really wanted to make some. Well Melissa (also on this blog!) has made them before so she told me how to make them. Thanks Melissa!
Glossy Accents was a great way to make these!
These magnets are really good. They actually work! You also use these flat marbles.
First you put a drop of the glossy accents on the marble
Then you put it onto your scrap booking paper and smoosh it down so the gloss goes over everything. You can see the bottom right one the gloss isn't everywhere and the others you can't see the gloss cause it's all over.
Melissa told me to put the marbles on first cause all the marbles are different sizes and you can cut them out after they've dried so you don't have to match them up after you've cut them out.
Then you cut them out and use a little super glue on the back and put the magnet on the back, let it dry and then you are done! The only thing I wish I would've done different was put less super glue on because I put too much and it seeped through so you could see it through the marble. But other than that I liked how they turned out!

Friday, October 9, 2009

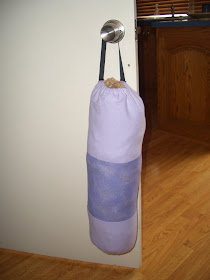
Grocery Bag Holder

I found this great grocery bag holder tutorial at Make it and Love it here. We were just using one of those reusable grocery bags (not exactly what they are for, but oh well!) Well I had some scrap material (finally a post that has different fabric, well at least it feels that way!) and I decided to make one. I messed up on a couple things, and I didn't do a ton of strips I just did three, but I like it! Enjoy!

Thursday, October 8, 2009

Key Holder

When we moved into our house we got I swear ten thousand keys. We were just putting them in a glass container and I could never figure out which key was which. Well I decided to make a key holder. I would've just bought one to hang up on my wall but we didn't have any more wall space next to our door, so I made this. Well I made it too late cause we already lost a couple keys and we didn't put some up cause we don't need those so we put them somewhere else. Anyways here it is!I used one of those magnetic bag clips that we bought from Ross. I took some ribbon and purse clip things and the fabric that I love! I cut a piece of the fabric that would cover the clip, then sewed the ribbon in a loop with the purse clips in so they would stay. Then I opened the magnetic clip and put the fabric in so it would say, then I took some other fabric and tied a bow around the top so it would stay as well. In hope this all made sense. It's a little hard to explain, but it works for what we need!

Wednesday, October 7, 2009

Ute Pajama Pants

My husband is a big Ute fan, so I decided to make him some Ute Pajama bottoms. I just got a pattern from JoAnns that was cheap and then got the fabric from JoAnns too.

I think he liked them!

Tuesday, October 6, 2009

Magnet and Dry Erase Board

I saw this idea on the Blog Make it and Love it! I LOVE that blog, it has been one of my very favorites! The address is makeitandloveit.blogspot.com in case you want to go over there and see what other fun things she has made!
Anyways, I went to Ben Franklin and got a 12X36 frame. I also got a 12X12 magnetic sheet, and used the same material I used for my headboard. (I absolutely love that material and have been using it for all sorts of projects!)
First I took the cardboard piece behind the frame and covered most of it with fabric. I was pretty lazy and just duct taped it on the back. Most people hot glue it on the back. I didn't do the whole thing because I knew I was going to put the magnetic sheet over that end.
Then I put the magnetic sheet in the frame first followed by the full glass piece then the cardboard covered with the fabric. And it was all done! I love it. The only thing was the fabric I used was very busy so it's kind of hard to see the writing. So we had to get a really thick dark dry erase marker. But if you don't want to find a special marker, just use a less busy and bright fabric.

I also wanted to spice it up just a little bit so I made fabric yo-yo's. There is a great tutorial here on how to make these.

Now we have something that we can keep notes of things we need to remember, things we need to buy, and things we need to save up for. Plus I just think it looks cute! Enjoy!

Monday, October 5, 2009

Tutu

These tutus are everywhere! I thought it would be cute to make a Halloween one for Lilly to go with her Halloween onesies. (Joni will be getting one, too!!!) There are so many different tutorials out there, but here is what I did:

I bought 3 colors of tulle, 1 yard each.


I bought some elastic, measured Lilly's waist, cut, and sewed the ends together. Note: You can also use ribbon instead of elastic.

I put the elastic around a chair to make it easier to tie on the tulle. This idea came from Make it and Love it (can you tell we like that blog?!)
I then cut the tulle into 3 inch wide strips with my rotary cutter.


Then I cut each piece in half on the fold.


I then tied each piece of tulle onto the elastic by folding the pieces in half, putting the loop up to the elastic, and pulling the ends through.


I tied each piece in a pattern.

Here is the finished product! (I may add some Halloween ribbons or spiders to it!)